There are 13 question types which will be explained in detail in this article:
Multiple Choice Question
With this type, you can create single-answer and multiple-answer questions. You can set up the question as the following:
Enter the question name, while keeping in mind that you will use the name to track your questions later so "Question 1" isn't a good idea. Additionally, note that this will not be shown to the students, so you can choose any name that makes sense to you and possibly other teachers.
Create the question text.
Note:
You can insert an image or video to display if you want to add a picture/video to the question. For the student, the image appears immediately after the question text and before the answer options.

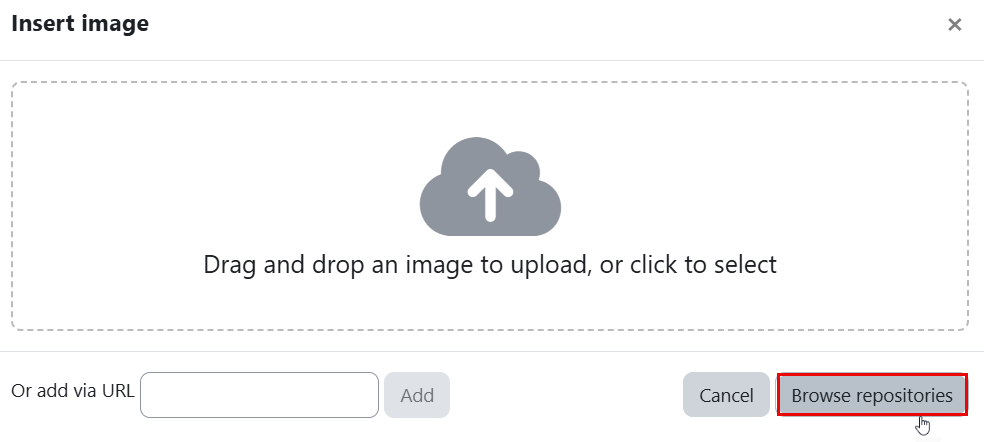
You may either drag and drop, or click the browse repositories to upload an image saved in your pc.

Set the default mark (i.e. the maximum number of marks for this question).

Choose whether students can only select one answer or multiple answers.


Choose whether to shuffle the answer options.

Enter the choices as the following:
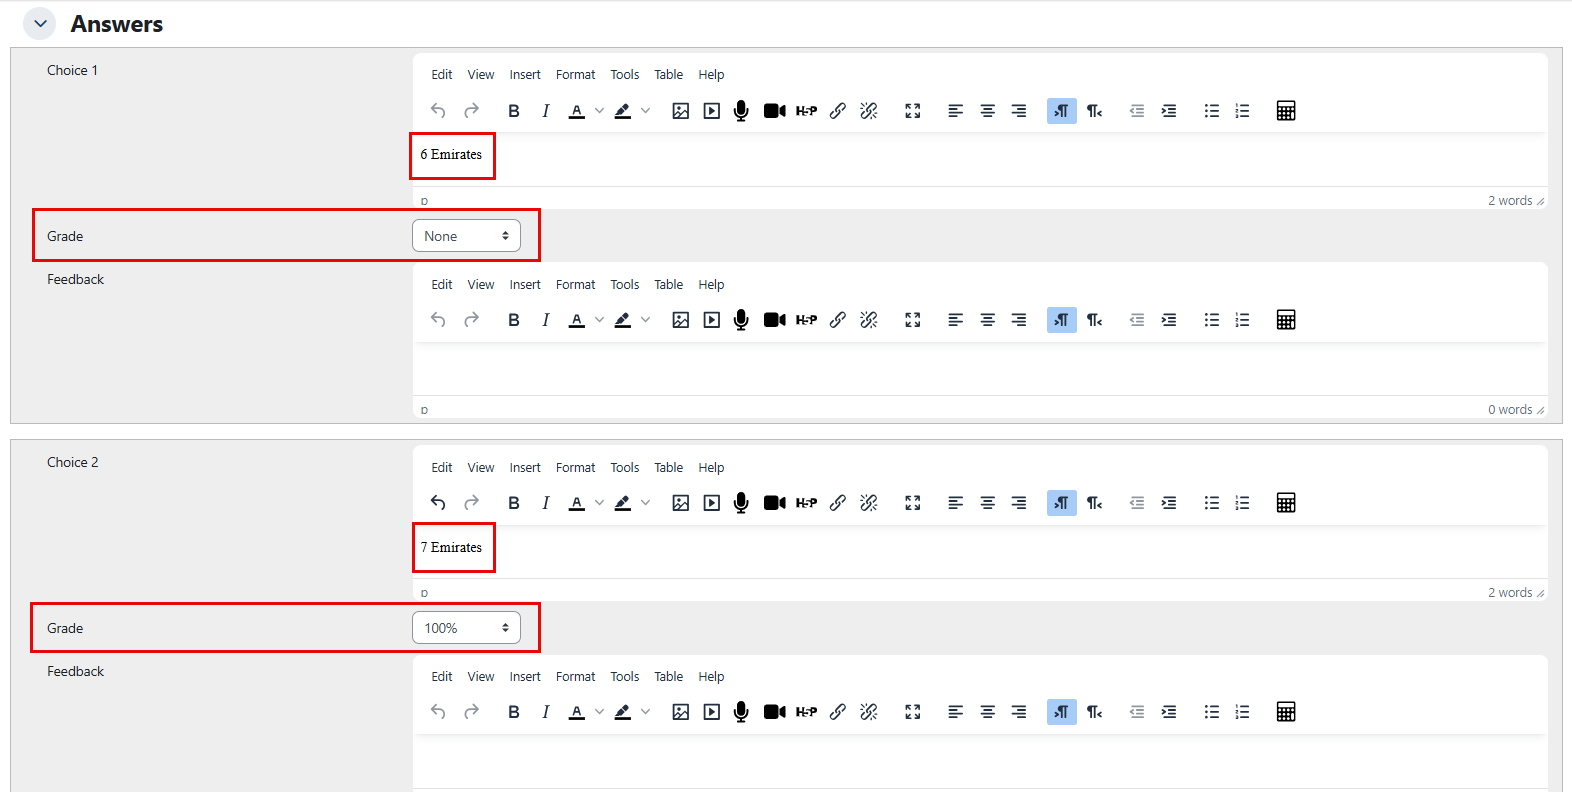
Write your first answer in the Choice 1 text field.
Select a grade percentage for the answer. This is the percentage of the total points for the question that choosing this response is worth. You can select both negative and positive percentages. For example, selecting a correct response in a multiple-answer question might give you 50% of the possible points, while selecting an incorrect response might subtract 10%. Please note that the total of all grades must add up to 100% in a multiple-answer question.
Be aware that if you allow multiple answers and have more than one correct choice, but do not use a negative grade percentage for incorrect answers, students can just select all options and receive the full grade.
If you wish, you can add feedback for each response. It may require a bit more work, but it’s good practice to explain to students why each answer is right or wrong using the feedback area. When students understand why an answer is correct or incorrect, they can analyze their own thinking and gain a deeper understanding. Your feedback will only be displayed if you select "Show Feedback" in the quiz body options.
Fill in the rest of the response choices in the rest of the form. Any unused areas will be ignored.
Click on the Save Changes button, once you are done.
True/False Question
In response to a true/false uestion, the respondent selects from two options: True or False. You can set up the question as the following:
Enter the question name, while keeping in mind that you will use the name to track your questions later so "Question 1" isn't a good idea. Additionally, note that this will not be shown to the students, so you can choose any name that makes sense to you and possibly other teachers.
Create the question text.
Note:
You can insert an image or video to display if you want to add a picture/video to the question. For the student, the image appears immediately after the question text and before the answer options.
You may either drag and drop, or click the browse repositories to upload an image saved in your pc.
Set the default mark (i.e. the maximum number of marks for this question).
Specify the correct answer for the question text.

Add any feedback to the responses, if needed.
Click on the Save Changes button, once you are done.
Below is an example:

Matching Question
Matching questions include a content area and a list of names or statements that must be correctly matched against another list of names or statements. In the Quiz Module, each match is equally weighted and contributes to the total grade for the question. You can set up the question as follows:
Enter the question name, while keeping in mind that you will use the name to track your questions later so "Question 1" isn't a good idea. Additionally, note that this will not be shown to the students, so you can choose any name that makes sense to you and possibly other teachers.
Create the question text.
Note:
You can insert an image or video to display if you want to add a picture/video to the question. For the student, the image appears immediately after the question text and before the answer options.

Set the default mark (i.e. the maximum number of marks for this question).
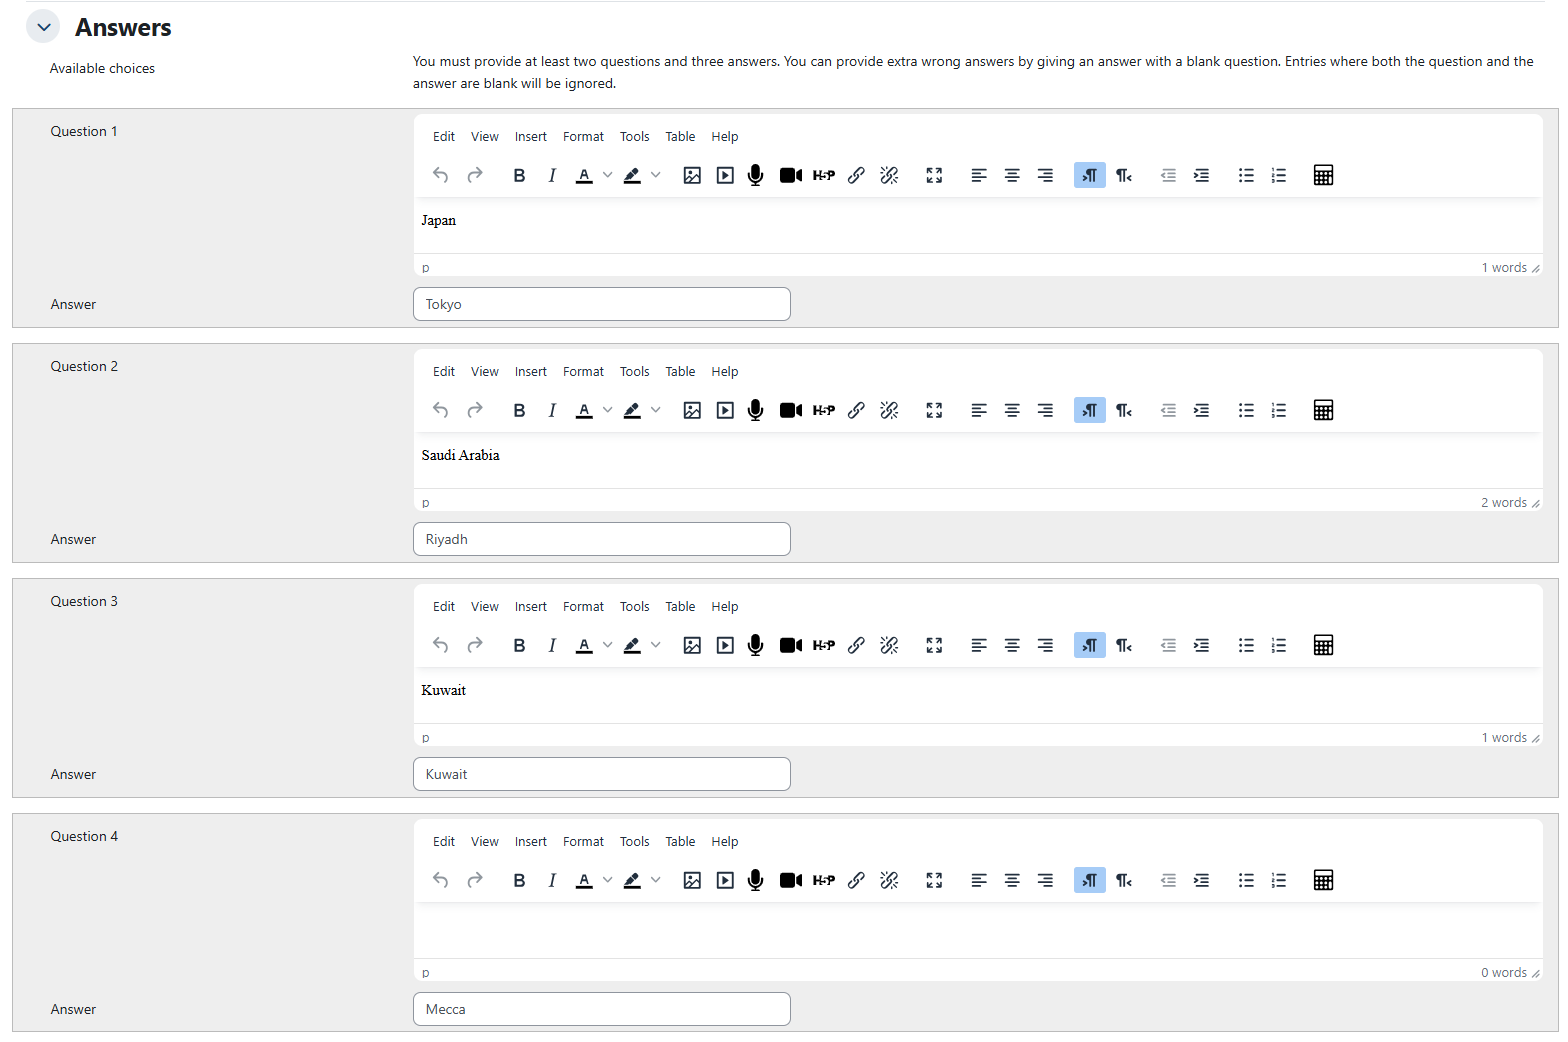
Specify the sub-question and its answer, noting that you must provide at least two questions and three answers. You can also provide extra incorrect answers by leaving a question blank. Below is an example of matching each country with its capital:
Click on the Save Changes button, once you are done.
Note:
Each sub-question is equally weighted to contribute towards the grade for the total question. For example, a student who correctly matches 3 of the 4 possible matches will receive 3/4 or 75% of the total possible score for that question.
Short Answer Question
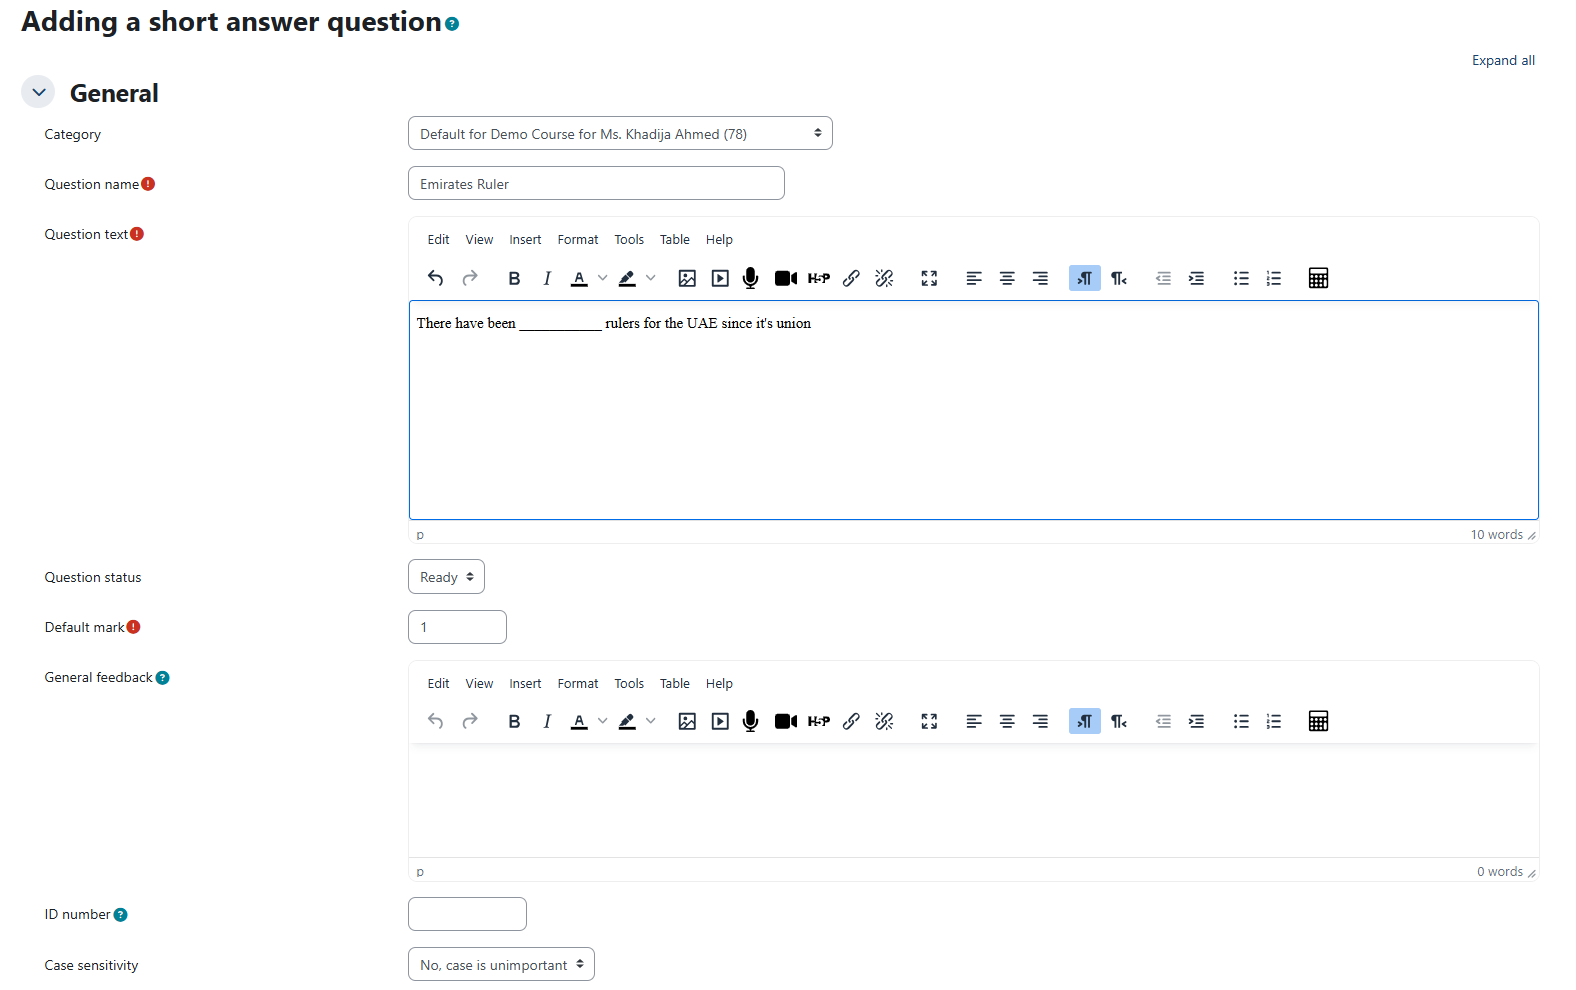
In response to a short answer question, the respondent types a word or phrase. There may be several possible correct answers, each with a different grade. Answers can be case-sensitive or case-insensitive. You can set up the question as follows:
Enter the question name, while keeping in mind that you will use the name to track your questions later so "Question 1" isn't a good idea. Additionally, note that this will not be shown to the students, so you can choose any name that makes sense to you and possibly other teachers.
Create the question text.
Note:
You can insert an image or video to display if you want to add a picture/video to the question. For the student, the image appears immediately after the question text and before the answer options.
Note:
If the answer is intended to fill a gap in the text, while typing the question text, use underscores (5 or more) to indicate where the gap is.
Set the default mark (i.e. the maximum number of marks for this question).
Specify whether the answer is case-sensitive. Case sensitivity can be tricky where capitalization is important. Will you accept Ban Ki-moon as well as ban ki-moon as an answer?

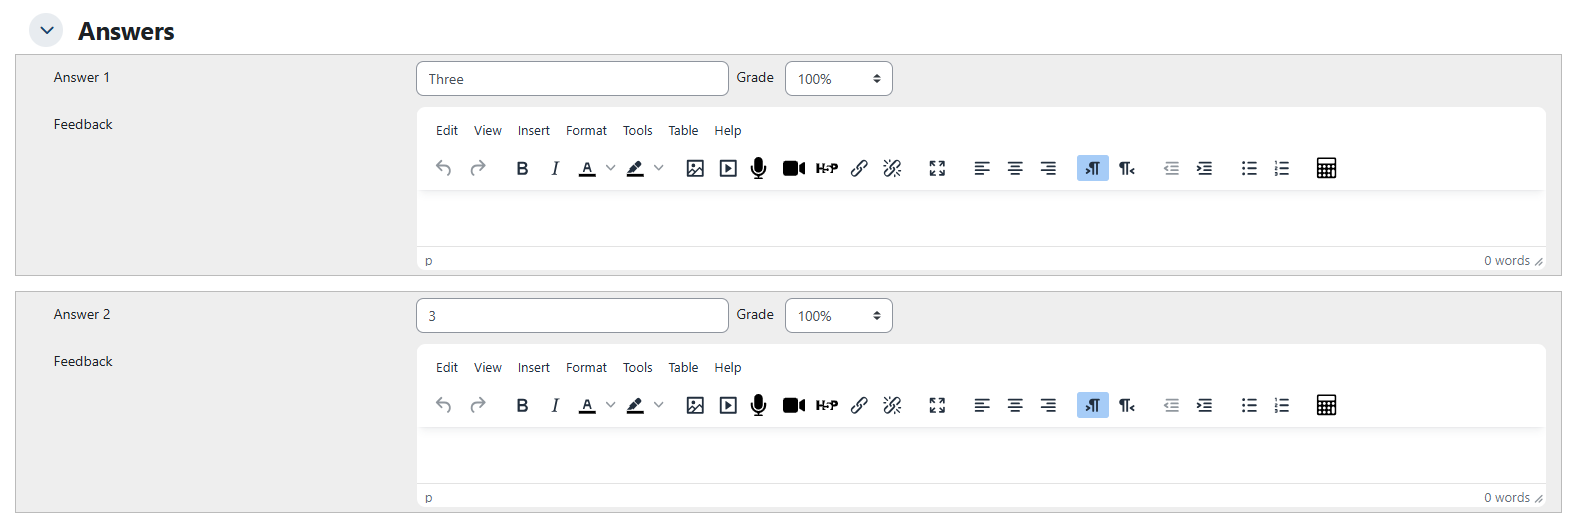
Fill in the answers you will accept and add a grade for each answer.
Click on the Save Changes button, once you are done.
Below is an example:
Essay Question
This allows students to write at length on a particular subject and must be manually graded. You can set up the question as the following:
Enter the question name, while keeping in mind that you will use the name to track your questions later so "Question 1" isn't a good idea. Additionally, note that this will not be shown to the students, so you can choose any name that makes sense to you and possibly other teachers.
Create the question text.
Note:
You can insert an image or video to display if you want to add a picture/video to the question. For the student, the image appears immediately after the question text and before the answer options.
Set the default mark (i.e. the maximum number of marks for this question).

Click on the Save Changes button, once you are done.
Calculated Question
This offers a way to create individual numerical questions by the use of wildcards (i.e you can use common variable names as x, y enclosed in curly braces to create the wildcards {x} and {y}) that are substituted with random values when the quiz is taken.
For example, if you want to create a large number of "Calculate the area of a rectangle" problems to drill your students, you could create a question with two wildcards (i.e. {base}, {height} created from the common base, height variable names) and put in the "Correct Answer Formula=" input field {base} * {height} (* being the multiplication sign).
When a student takes the test, Moodle will randomly select values for {base} and {height} and grade the response using the result of the Correct Answer Formula.
You can set up the question as the following:
Enter the question name, while keeping in mind that you will use the name to track your questions later so"Question 1" isn't a good idea. Additionally, note that this will not be shown to the students, so you can choose any name that makes sense to you and possibly other teachers.
Create the question text.
Note:
You can insert an image or video to display if you want to add a picture/video to the question. For the student, the image appears immediately after the question text and before the answer options.
Set the default mark (i.e. the maximum number of marks for this question).

Add the formula for the answer. This formula must include at least the wildcards that appear in the question text.
Choose the grade the student will receive for this question if they provide this answer. For example, you could assign 100% for a correct answer and 50% for an answer that is nearly correct. At least one of the answers must have a grade of 100%.
Determine the tolerance for error that you will accept in the answer. The tolerance and tolerance type settings combine to give a range of acceptable scores. So, if tolerance = t, correct answer = x, and the difference between the user's answer and the correct answer is dx, then the tolerance types are as follows:
Nominal - mark correct if dx <= t
Relative - mark correct if dx / x <= t
Geometric - mark correct if dx² / x² <= t²
Click on the Save Changes button, once you are done
Calculated Multichoice Question
Calculated multiple-choice questions are similar to multiple-choice questions, with the added feature that the answer choices can include formula results based on numeric values randomly selected from a set when the quiz is taken. They use the same wildcards as Calculated questions, and these wildcards can be shared with other Calculated multiple-choice or regular Calculated questions
The main difference is that the formula is included in the answer choice as {=...} i.e. if you calculate the surface of a rectangle {={l}*{w}}.
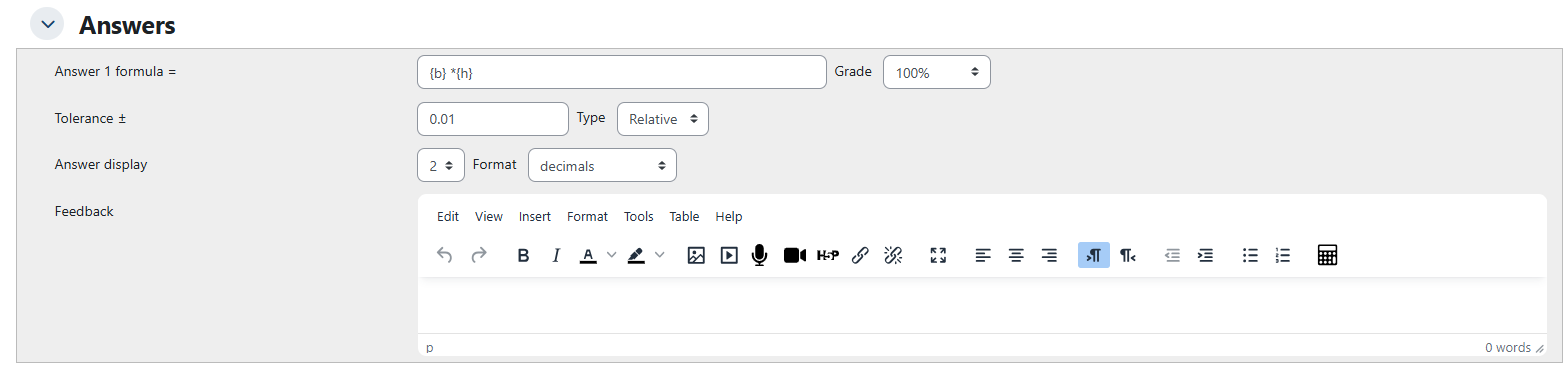
Simple Calculated Question
Simple calculated questions offer a way to create individual numerical questions whose response is the result of a numerical formula that contains variable numerical values by the use of wildcards (i.e. {x}, {y}) that are substituted with random values when the quiz is taken. You can set up the question as the following:
Enter the question name, while keeping in mind that you will use the name to track your questions later so "Question 1" isn't a good idea. Additionally, note that this will not be shown to the students, so you can choose any name that makes sense to you and possibly other teachers.
Create the question text.
Note:
You can insert an image or video to display if you want to add a picture/video to the question. For the student, the image appears immediately after the question text and before the answer options.
Set the default mark (i.e. the maximum number of marks for this question).

Fill the Correct Answer Formula using the {param} names used in the question text. Here we use {b} for base and {h} for height. You will set the Grade to 100%, as this is the only answer to this question, and leave the other parameters as they appear (0.01 relative means ±1% tolerance).
Click on the Save Changes button, once you are done.
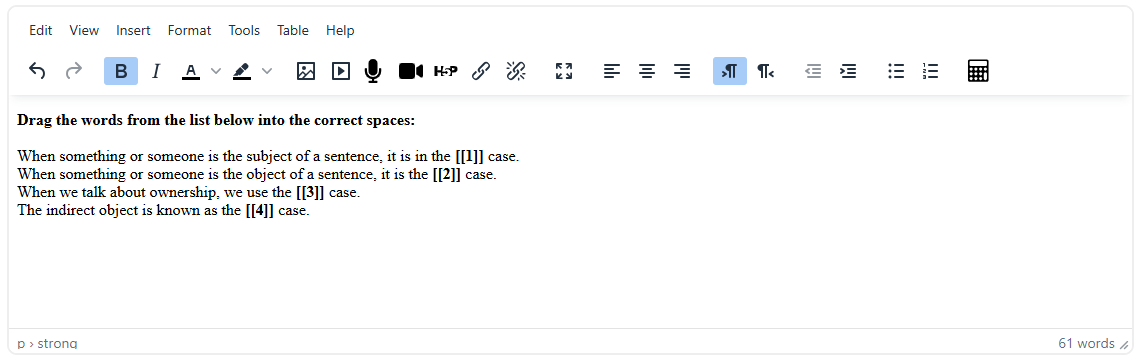
Drag and Drop into Text Question
In this type, students select missing words or phrases and add them to the text by dragging boxes to the correct location. Items may be grouped and used more than once. You can set up the question as the following:
Enter the question name, while keeping in mind that you will use the name to track your questions later so "Question 1" isn't a good idea. Additionally, note that this will not be shown to the students, so you can choose any name that makes sense to you and possibly other teachers.
Create the question text.
Note:
You can insert an image or video to display if you want to add a picture/video to the question. For the student, the image appears immediately after the question text and before the answer options.


Note:
While adding the question text, use double square brackets '[[n]]' with a number in place of the word you wish the students to find, as illustrated below:
Set the default mark (i.e. the maximum number of marks for this question).

Under the Choices section, add the missing words or phrases in the correctly numbered boxes (you may add extra ones to make the question harder). If you tick 'Shuffle' the display order will be shuffled:

Manage the groups, noting that choices within the same group are color-coded and can only be dropped into a gap with the corresponding color. Choices marked as "Unlimited" may be used in multiple locations.
Click on the Save Changes button, once you are done.
Below is an example:


Note:
It is not possible to have drag boxes containing multiple lines. If you want to drag long sentences - don't. Give each a label and drag the label.
Drag and Drop Markers Question
This question type allows students to drop markers onto an area on a background image. Drag and drop markers questions differ from Drag and drop onto image question type in that there are no predefined areas on the underlying image that are visible to the student. You can set up the question as the following:
Enter the question name, while keeping in mind that you will use the name to track your questions later so "Question 1" isn't a good idea. Additionally, note that this will not be shown to the students, so you can choose any name that makes sense to you and possibly other teachers.
Create the question text.
Note:
You can insert an image or video to display if you want to add a picture/video to the question. For the student, the image appears immediately after the question text and before the answer options.
Set the default mark (i.e. the maximum number of marks for this question).

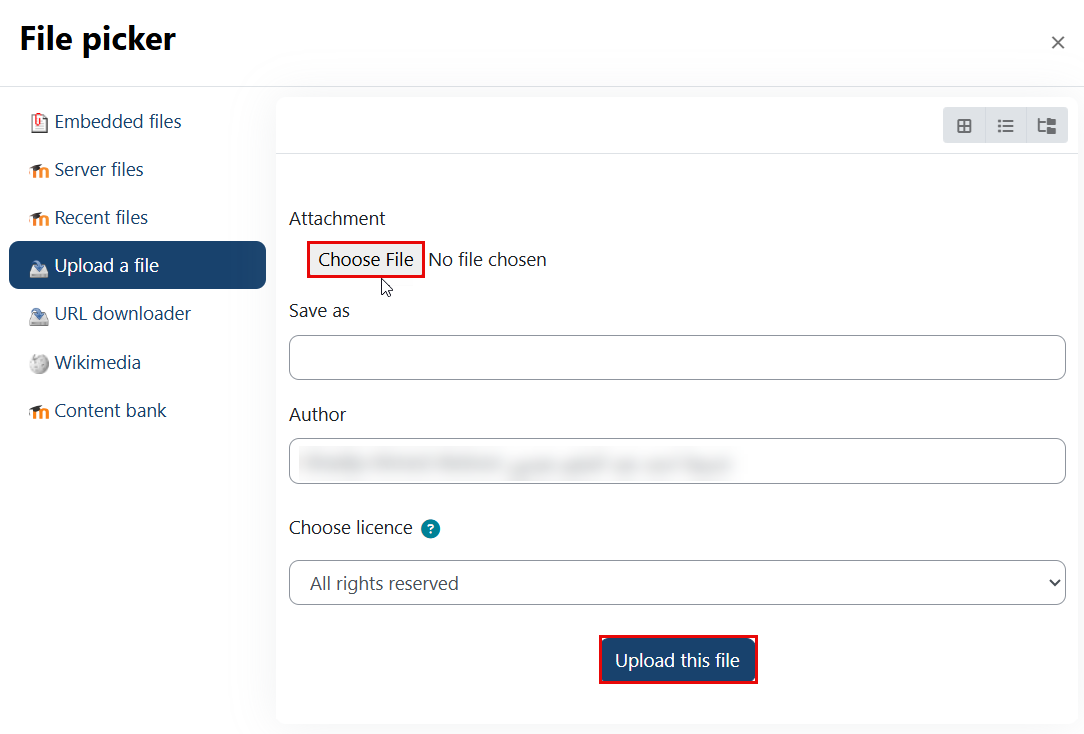
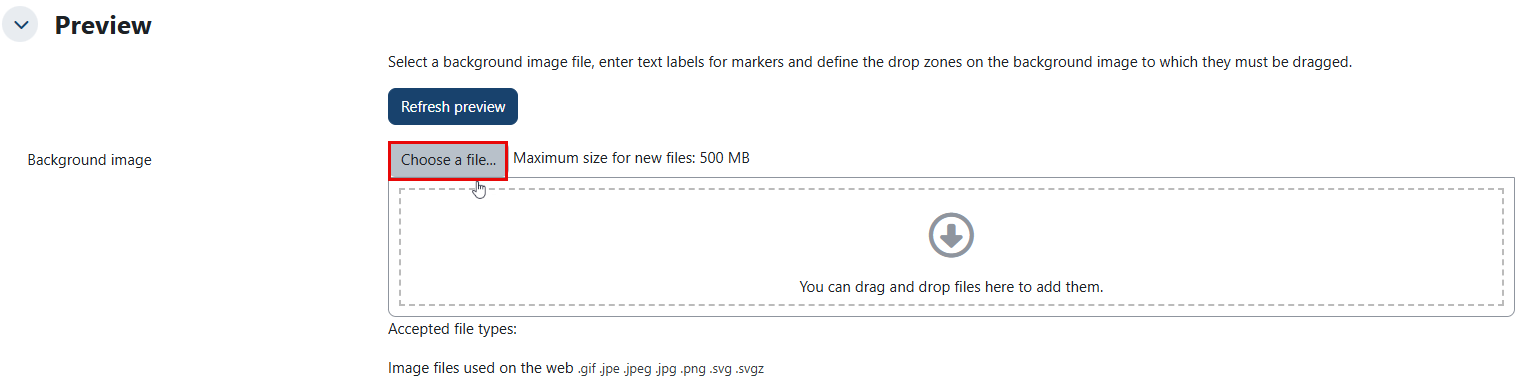
In the Preview section, click the "Choose a file" option to upload an image, as illustrated below. Note that larger images will be displayed at a maximum size of 500 MB. Your image will then appear below the file upload box.

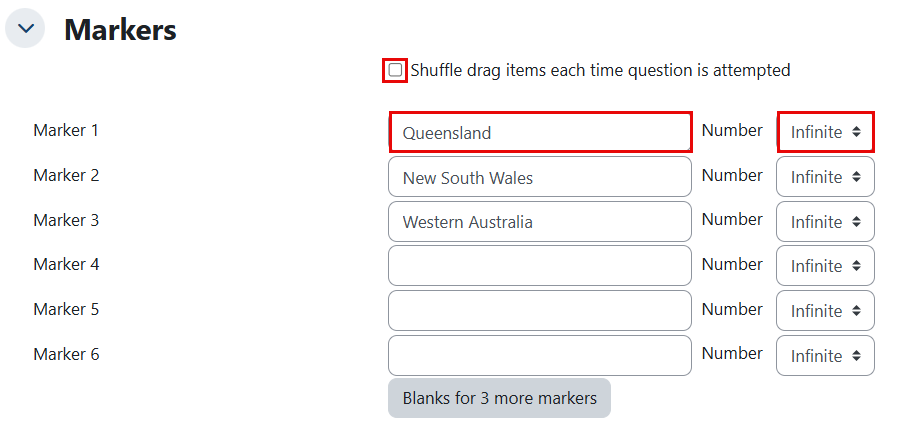
In the Markers section, add the words you want the students to drag onto the areas you select. In the 'Number' dropdown, you can choose how many times each marker can be used. Selecting 1 means that once the marker has been used, it will no longer be available in the list. It is fine to leave the numbers as the default 'Unlimited,' which means that each marker will remain available even after being used. Additionally, you can shuffle the items.
The drop zones are defined by typing coordinates. As you type, the preview above is updated immediately, allowing you to position elements through trial and error. You can choose the shape as follows:
Circle – you will enter the coordinates as: centre_x, centre_y; radius. For example: 80, 100; 50
Polygon – you will enter the coordinates as x1, y1; x2, y2; …; xn, yn. For example: 20, 60; 100, 60;20, 100
Rectangle – you will enter the coordinates as top_left_x, top_left_y; width, height. For example: 20, 60; 80, 40
Click on the Save Changes button, once you are done.
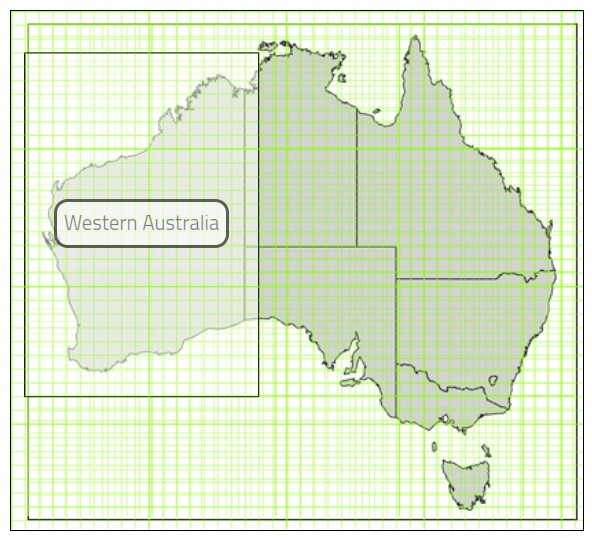
Below is an example:

Which will illustrate the below image:
Drag and Drop onto Image Question
This question type allows students to drag words, images, or both from a list and drop them into pre-defined gaps on a base image. You can set up the question as the following:
Enter the question name, while keeping in mind that you will use the name to track your questions later so "Question 1" isn't a good idea. Additionally, note that this will not be shown to the students, so you can choose any name that makes sense to you and possibly other teachers.
Create the question text.
Note:
You can insert an image or video to display if you want to add a picture/video to the question. For the student, the image appears immediately after the question text and before the answer options.
Set the default mark (i.e. the maximum number of marks for this question).

In the Preview section, click the "Choose a file" to upload an image, as illustrated below. Note that larger images will be displayed at a maximum size of 600 x 400 pixels. Your image will then appear below the file upload box.
In the Draggable items section, you can upload images if you leave the type as 'draggable image' or you can type in words if you change the type to 'draggable text'. You may have a mixture of images and text.
In the Drop zones section, you choose which items to go in which zone.
Click on the Save Changes button, once you are done.
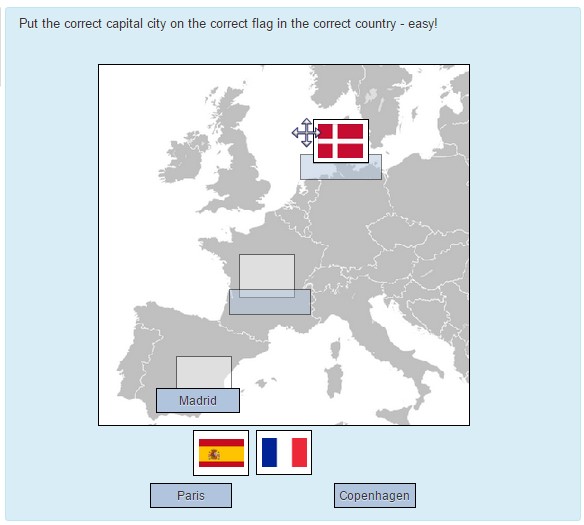
Below is an example:
In the Preview section, a basic map of Europe is uploaded.
In the Draggable items section, the capital cities are added as the type 'draggable text' and the flags are added as the type "draggable image".
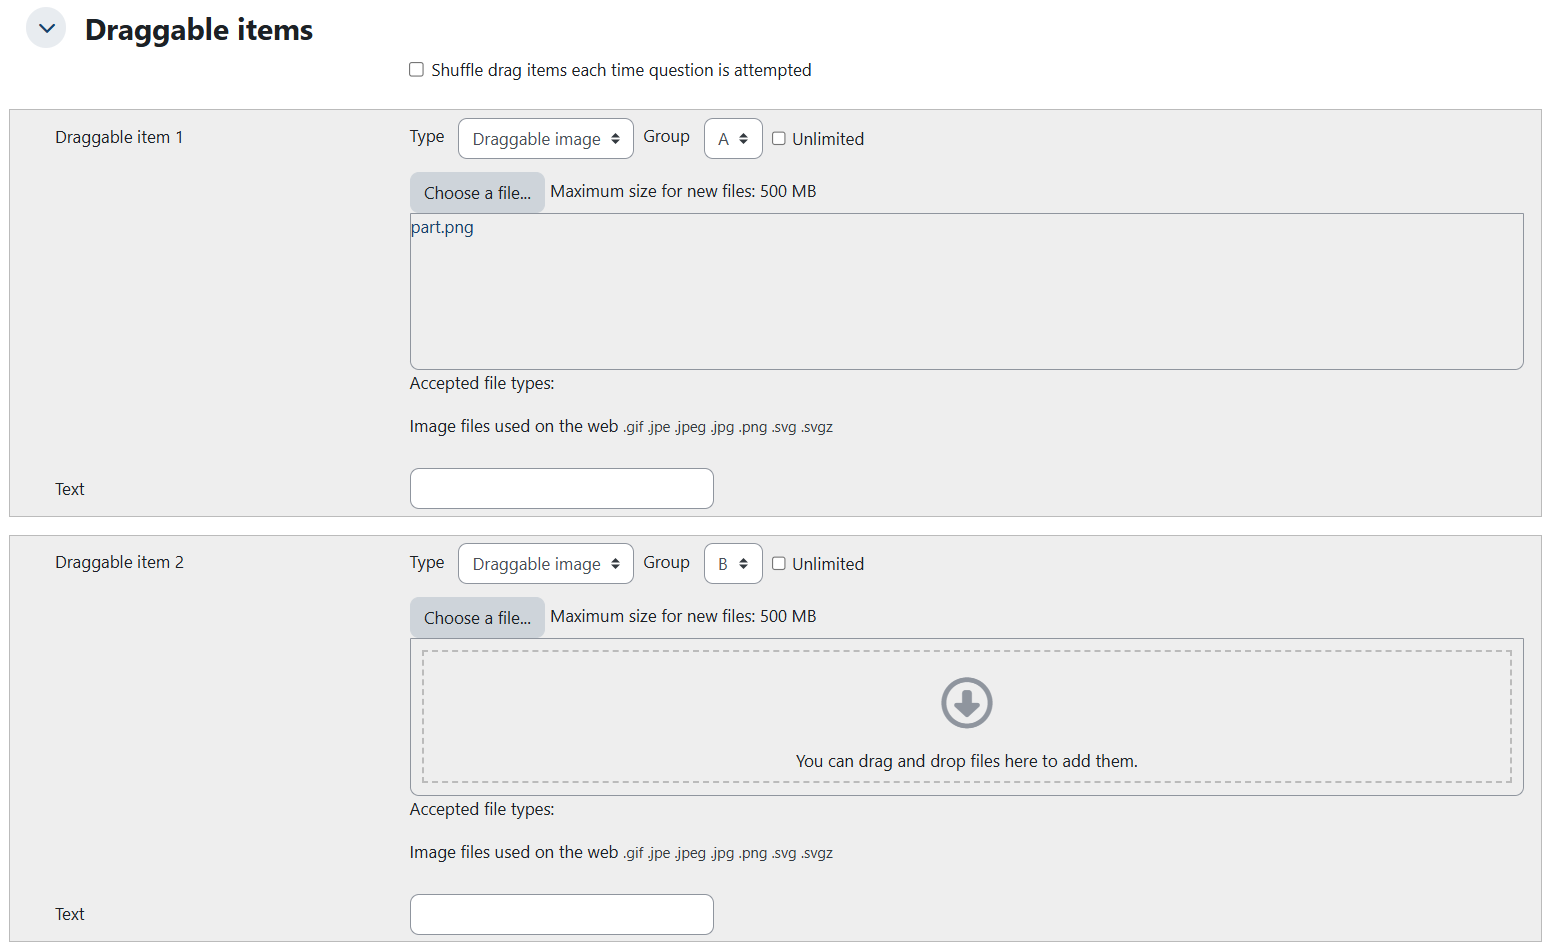
All draggable images (the flags) are in Group 1 and all draggable text items (the capital cities) are in Group 2.
In the Drop zones section, an item from the previously added options is chosen from the drop-down. The Group 1 boxes will display in a different color from the Group 2 boxes.
When the boxes are dragged to their appropriate places on the background image, the coordinates in the Drop zones section are updated automatically.
Select Missing Words Question
This is very similar to the Drag and drop into text question type, but uses drop-down menus in the text instead of drag-boxes. This works well where the question text is very long and you would have to scroll a lot to do drag and drop. You can set up the question as the following:
Enter the question name, while keeping in mind that you will use the name to track your questions later so "Question 1" isn't a good idea. Additionally, note that this will not be shown to the students, so you can choose any name that makes sense to you and possibly other teachers.
Create the question text.
Note:
You can insert an image or video to display if you want to add a picture/video to the question. For the student, the image appears immediately after the question text and before the answer options.
Note:
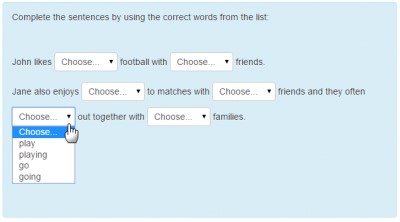
While adding the question text, use double square brackets '[[n]]' with a number in place of the word you wish the students to find, as illustrated below:

Set the default mark (i.e. the maximum number of marks for this question).
Add the missing words or phrases in the correctly numbered boxes in the Choice section. (You may add extra ones to make the question harder. If you tick Shuffle the display order will be shuffled.

If choices are grouped, then only items in the appropriate group will display in the drop-down menu of a blank. In the example below, Group 1 are verbs and Group 2 are possessive adjectives.
Click on the Save Changes button, once you are done.
Record Audio Question
This type is similar to the essay question type, where the student can express themselves and the answer has to be manually graded; however, instead of typing a text, the student should record an audio as a response to the question. You can set up the question as the following:
Enter the question name, while keeping in mind that you will use the name to track your questions later so "Question 1" isn't a good idea. Additionally, note that this will not be shown to the students, so you can choose any name that makes sense to you and possibly other teachers.
Create the question text.
Note:
You can insert an image or video to display if you want to add a picture/video to the question. For the student, the image appears immediately after the question text and before the answer options.
Set the default mark (i.e. the maximum number of marks for this question).
Specify the maximum record duration, as illustrated below, noting that the maximum recording duration is 2 minutes.

Click on the Save Changes button, once you are done.
Note:
The “Record Audio” question type is approved for mid-term assessment only.