- Print
- DarkLight
- PDF
Watch our video tutorial about this topic below:
To create an online exam, please follow the below steps:
- Log in to Moodle.
- Select the course from the Dashboard.
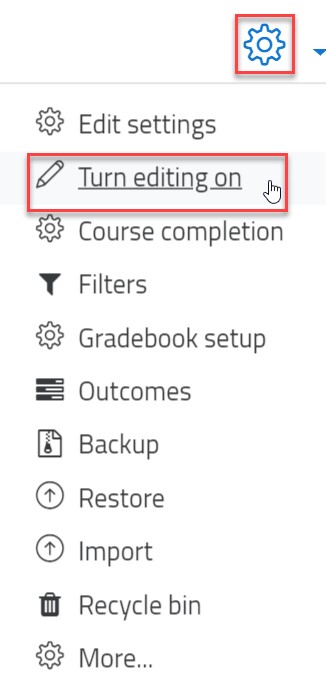
- Inside the course, turn editing on by clicking on the gear icon and then the Turn editing on option.

- Under a specific topic, click on the Add an activity or resource button.

- Choose Quiz, and click on the Add button.
- Enter the quiz name and description, as needed.
Set up the Timing settings
- Open the quiz: Click the Enable button and set the date and time for the quiz to be open for the students.
- Close the quiz: Click the Enable button and set the date and time for the quiz to be closed for the students, so they won’t be able to take the quiz anymore.
- Time limit: Click the Enable button and set the countdown timer for the quiz attempt. Noting that you can set it by seconds, minutes, hours, or days.
- When time expires: Choose what happens if the student fails to submit the quiz attempt before the time (mentioned in the previous point) expires. There are three options:
- Open attempts are submitted automatically.
- Allow a grace period for the attempt to be submitted without changing the responses. (the period is specified by you).
If the attempt is not submitted before the time expires, then the attempt is not counted (the student will take zero). Note:If the student is actively working on the quiz, then the attempt will be submitted once the time is up. However, if they are logged out without submitting the attempt then this setting controls what happens.
- If you choose to give the students a grace period (second option of the previous setting), then you can specify the amount of extra time.
Set up the Grade settings
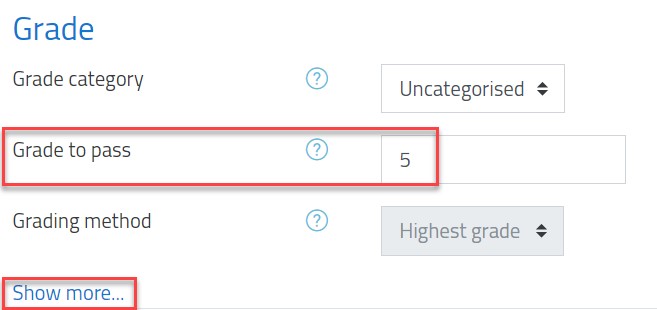
- Under the Grade section, enter the Grade to Pass and click on Show more button.

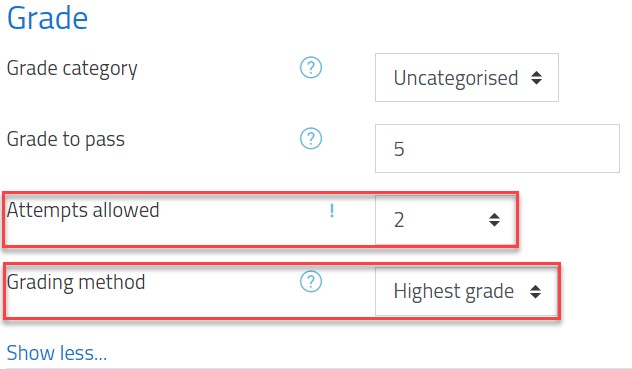
- Enter the number of Attempts allowed and the grading method, as illustrated below. Noting that if you choose the attempts allowed more than once, you can then change the grading method to be either the highest grade scored, average grade score, first or last attempt.

Set up the Layout settings
You can specify how many questions to appear in each page of the quiz. By default it is one question per page.
Set up the Question Behaviour settings
If you would like to shuffle the options in multiple choice and matching questions, then make sure that the answer to the Shuffle within questions is Yes, as illustrated below:
Set up the Review Options settings
In this section, you can control when the students will be able to view the quiz report, reviews and feedback. In order to allow the students to view this kind of information only after the quiz closed date and time has passed, unselect all options in the Immediately after attempt section and Later while the quiz is still open section, as illustrated below:
Set up the Extra Restrictions on Attempts settings
In this section, if you specify a password in here then participants must enter the same password before they are allowed to make an attempt on the quiz. This is useful to give only a selected group of students access to the quiz.
You can even control the browser security by clicking on Show more, as illustrated below:
The Brower Security has two options:
1. Browser security should be set through the LockDown Browser Dashboard:
LockDown Browser is a customized web browser that must be downloaded and installed on the computer that the student uses to attempt the quiz. It restricts student use more effectively than a pop-up window option.
Features include full screen, without web navigation options, shortcut keys including copy and paste are disabled and of course surfing the web and using any other application during an exam.
More details about this feature is available in this article.
2. Full screen pop-up with some JavaScript security
If this option is selected, then:
- The quiz will only start if the student has a JavaScript-enabled web-browser.
- The quiz appears in a full-screen popup window that covers all the other windows and has no navigation controls.
- The students are prevented, as far as is possible, from using facilities like copy and paste.

Set up the Restrict Acces settings
Restrict Access setting is used to allow students from a certain section (or CRN) to view an activity/quiz. You can learn about the restrict access settings through the Restrict Access articles.


